
In the analytics world, data collection is extremely important; Any time someone gets the wrong answer from their data (or no answer at all) they lose confidence in the data and that negatively affects every aspect of the organization. At Confidence Interval, we rely almost exclusively on one tool to make sure our data are correct: Charles Proxy. Charles Proxy allows analysts and developers to see — in real time — which data are being sent to the web analytics database (like Google Analytics or Omniture) by clicking the various buttons on a web page or app!
Charles is a very powerful tool and it has tons of configuration options. Over the years, we found ways around the common problems and discovered some off-the-beaten-path features which save us (and our clients) a lot of time and money. This article will help you get up and running with Charles so you can test analytics tags with ease.
Common Complaints about Charles Proxy
A lot of web analysts and developers are turned off of Charles because they can’t get it to work in their particular situation. The use Charles for a few minutes, only to realize it’s not giving them the expected results. So, they get frustrated and look for a different tool.
This article addresses the following issues:
- Can’t inspect HTTPS or SSL traffic
- Can’t differentiate important calls from unimportant calls
- Can’t see any calls in Firefox
These problems are vexing, indeed. But, each problem has a solution.
HTTPS and SSL problems
If you have installed Charles Proxy and you’re seeing little red Xs, nonsensical, garbled, or encrypted text in the output, it’s probably because you haven’t installed the Charles SSL Certificate Authority and enabled SSL proxying.
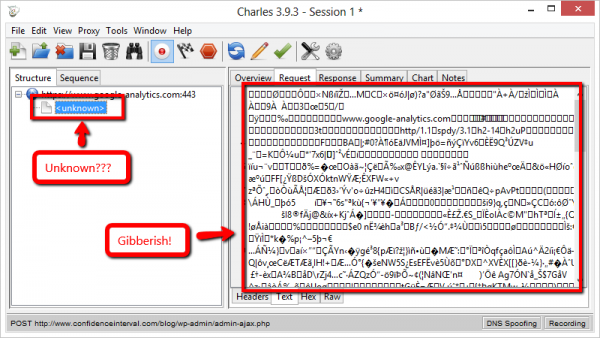
The Charles website has a fine article on how to fix this. But not everybody knows where to find it, so I’ve created a few links. Follow these steps and it will be solved!
Install the Charles CA SSL Certificate
Enable SSL proxying (but be careful not to enable SSL proxying for all hosts, or it could cause infinite password prompts to appear)
Filtering Specific Hosts/Domains
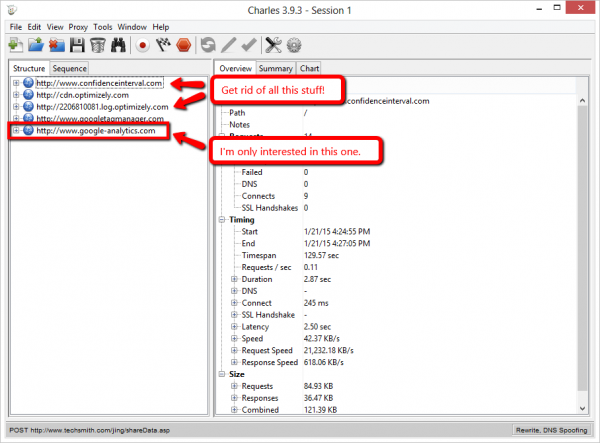
By default, Charles captures traffic from every host/domain that your browser talks to. But, you can configure Charles to show only specific traffic. This is very useful when testing for Web Analytics tags, because web analytics tags are typically sent to a single host/domain.
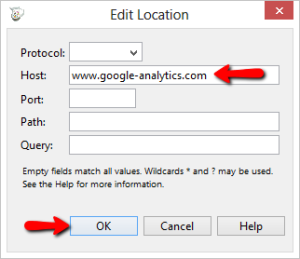
Before you start, you should write down the hosts/domains from which you want to see traffic. For example, I commonly configure Charles to show only traffic from www.google-analytics.com.
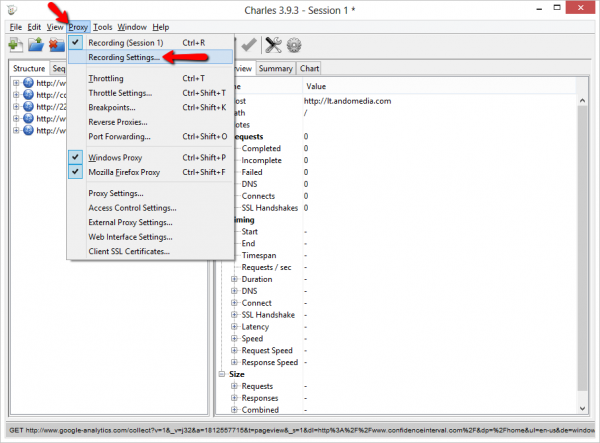
Here are the steps I use to show only traffic from www.google-analytics.com.
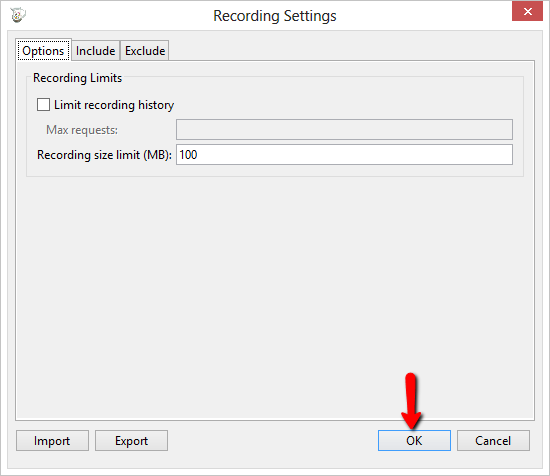
1. Go to the Proxy menu and click the Recording Settings item.
The Proxy > Recording Settings menu option
2. Click the “Include” tab and click “Add”.
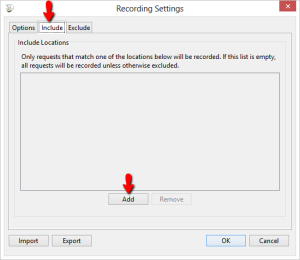
3. Type the name of the host or domain you would like to filter in the “Host:” area. I used www.google-analytics.com, where all Google Analytics data are sent. The protocol, port, path, and query settings are optional (and unnecessary in this case).
4. Click OK to exit the Recording Settings box
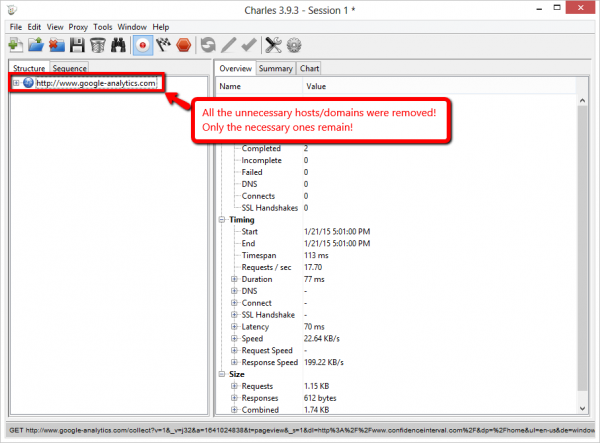
5. Clear your Charles session, and refresh your browser web page.
Now, Charles will show you only the important hosts/domains!
Can’t See any Calls in Firefox
Upon initial installation, Charles changes the Operating System’s proxy settings so that, when you start a browser, Charles will be automatically recording the conversation between web servers and your web browser. However, some extra steps are required to use Charles with Firefox, because Firefox uses independent proxy settings, whereas most other browsers use your Operating System’s proxy settings.
The Charles web site has great instructions for making Firefox work with Charles, but I don’t find the documentation to be very easy to follow.
Here are the basic steps to fix it:
- Download and install the Charles Firefox Add-On
- Enable Charles using the Firefox Add-On
- Install the Charles SSL Root Certificate
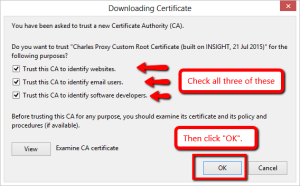
After downloading the Charles Firefox Add-On, there is a new menu in Firefox’s Tools menu. Use that menu to Enable Charles and install the Charles SSL Root Certificate.
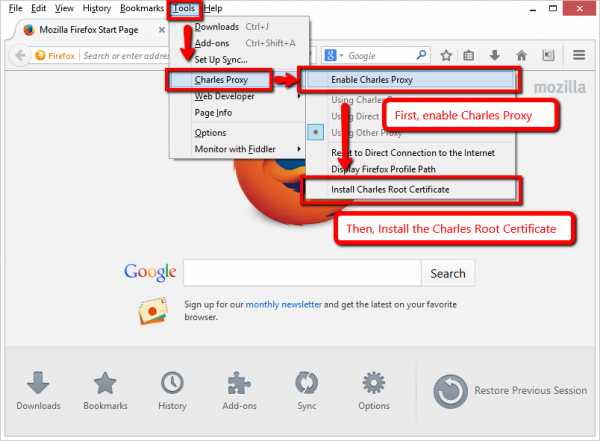
Then, click to enable all functions of the Charles Root Certificate.
After installing the Add-On, enabling it, and installing the Root Certificate, you should be able to see all your calls in Charles.
Conclusion
Hopefully, this tutorial helps you use Charles like a pro. We use Charles exclusively for testing, and these tips have made our lives a lot easier.
For more information, or for help with other Charles, problems, contact us for help!